While waiting for the subdeck to dry we'll work on the bilge pump. We do this now because of the way I installed my motors and because you need to think about its placement early so you don't have interference problems as you put the ship together. You can make your own pump or purchase one through SWAMPWORKS. I built my own with a 6 volt DC motor (use an inexpensive but high RPM 540 or 600 series) and a PVC blind cap for 1" ID PVC pipe as the pump casing. Buy the blind cap, a 1-1/2" dia. steel washer (with an approximately 1/4" diameter center hole), 1/4" ID clear tubing, clear silicon caulk, and some plastic Mylar sheeting from a hardware store. The motor, as well as a pack of 1/8" ID brass collars w/set screws, #4-32 (a bolt standard meaning "#4 size having 32 threads per inch") or #4-40 x 1/4" round-head screws, #0 x 3/8" wood screws, and thin brass sheeting (around 0.625" in thickness), can be bought from your local hobby center.
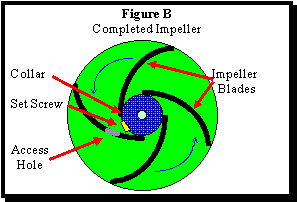 First build the impeller. Using metal snips cut two, three or four 1/4" wide equal length strips from the brass sheet. Bend them into evenly shaped crescents and set them to one side - these are the impeller blades. Using coarse sandpaper sand the top of the steel washer to clean and scuff the surface. Do the same to one end of the brass collar, then remove the set-screw. Set the washer on a safe, heat-resistant surface. Center the collar on the washer, then place the blades (two, three, or four - the choice is yours) on the washer equally distant from one another (do not place end of blade over set-screw hole). Having the collar centered and the impeller blades spaced evenly on the washer is very important. This assembly will be rotating at several thousand RPM's. Any gross imbalances will quickly wear out the bearing of the motor. The impeller, when assembled, will spin counter-clockwise (as you are looking at it), so the crescents should have the bow to the left and the ends to your right when vertical. (Figure B) Carefully solder the pieces into place using a propane torch, flux and silver solder for strength. Gently pour a little water on the assembled impeller to cool it, then immerse it in water for a few seconds.
In this four-blade version, the hole for the set-screw is blocked by a blade. Drill a hole just larger than the set-screw through that blade, then insert the set-screw. Place a piece of 1/8" brass rod into the collar's center hole, fasten it into place with the set-screw, then roll the assembly between your fingers to check the balance. Use a file to create a flat spot on the last 1/4" of the motor shaft to give the set screw a place to hold. Next mount the impeller on the motor shaft and run it to again check the balance. If it checks out, move on to building the pump case.
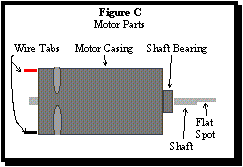 Drill a hole in the center of the top of the PVC cap (the pump casing) equal in size to the shaft bearing of the motor you are using. (see Figure C for motor terms) There should be two mounting holes on the front of the motor. Measure their distance from the outer portion of the shaft bearing, then drill a hole in the casing top this distance from the outer edge of the first hole. Test fit the motor and pump casing together to ensure the hole is in the correct place. Drill a second hole on the opposite side of the pump casing and again ensure that it lines up with the screw holes in the motor. Use two #4-32 or #4-40 x 1/4" round head screws (or shortened versions of longer ones) to secure the motor to the casing to ensure they fit into the holes. Place a thin nylon washer and the impeller onto the shaft (with the blades facing away from the motor) as high up as it will go without touching the top of the pump casing. If this is higher than the flat-spot on the shaft, note how much higher the flat spot must be extended. Measure the distance from the bottom, open end of the pump casing to the disk of the impeller. Mark this distance on the outside of the pump casing.
 While holding the open end of the casing towards you, imagine the motion of the impeller spinning counter-clockwise within the pump casing. The impeller flings water to the outside of the pump casing, now the water needs a place to go. Remove the impeller and drill a 9/32" hole into the side of the pump casing at the mark you previously made. This hole must be drilled at an angle so that one side of the hole is flush with the inside of the pump casing. (Figure D) Fit a 2" length of 9/32" OD brass tubing into the hole and mark with a scribe the excess material inside the pump casing that needs to be removed. Remove the tube and cut off this material, filing the edges smooth and scuffing the outside of the tube so the epoxy will grip. Epoxy the tube into the pump casing and let dry overnight. After it has dried, remove the excess material from bottom of the pump casing and the motor shaft using a belt sander. Cut a square or rectangular piece of clear Mylar plastic, large enough to cover the bottom of the pump casing, and place it on the bottom of the pump casing to act as a cover. Drill 4 small holes through it into the pump casing using a #0 or 3/32" drill bit and then screw in two #0 x 3/8" wood screws. Mark on the plastic where the center of the impeller disk is, then remove the cover. Secure the plastic to a piece of wood using clamps or by screwing it down, then carefully drill a 3/8" or 1/2" hole into the cover where you made your mark. This is the pump intake. Now, at the same level as the impeller disk drill a small, 3/64" hole into the pump casing aiming for the center. This hole serves two purposes. One, it provides access into the casing for an Allen wrench to tighten the set-screw on the impeller; two, it lets air escape and allows the pump to prime. Place a bead of silicone around the bottom of the pump casing and screw the Mylar cover into place. Let dry several hours, then solder wires to the motor wire tabs.
While the silicon dries start making the pump outlet. By IR/CWCC rules it can only have an orifice 1/8" in diameter (3/32" if it is a 1/2 unit pump). There are several methods to constucting an outlet. One is to take a 2" length of 3/8" to 1/2" solid brass rod and secure it into a lathe. Drill a 1/8" hole in the center, then turn down the outside circumference to 9/32" for a length of 3/4 - 1". Cut through the rod at the 1" mark with a hacksaw and shave the end flat with the lathe.
 If you don't have a lathe you can also solder several different lengths of various diameters of brass tubing together. Start with 1/8" ID and place it inside the next 4 sizes of brass tube until the outside diameter is 9/32", each piece shorter than the next. Flux them all and, using the propane torch, solder them together. Cut the ends off at the desired length. (Figure E) This is similar to the method we will use in the next section to build the stuffing tubes for the propeller shafts.
Now we will build and install the stuffing tubes for the propeller and rudder shafts.